


© 2026 New Orleans Handyman, LLC. All Rights Reserved.
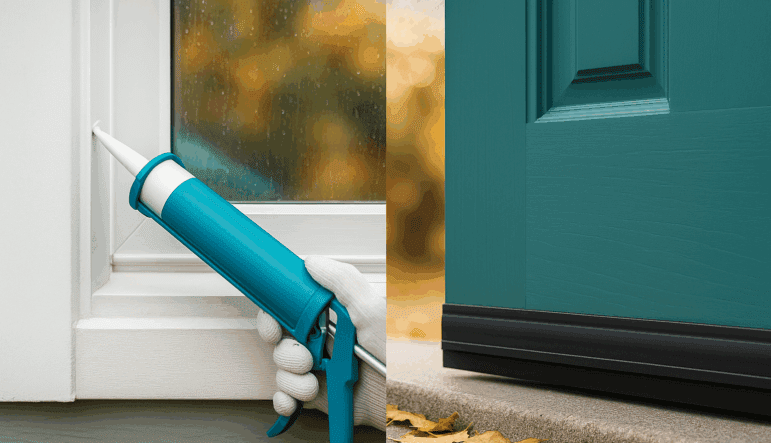
New Orleans homes take a beating—sun, humidity, sudden downpours, and wind-driven rain all find the tiniest gaps around doors and windows. A quick check of your caulk and weatherstripping can stop drafts, protect trim and floors, and keep energy bills in check. Why leaks show up now (NOLA edition) Humidity + heat shrink and swell wood, creating hairline gaps. Wind-driven rain pushes water behind brittle or missing caulk. Settling + older trim profiles (hello, charming frames) leave uneven seams. High A/C usage makes pressure and temperature differences that pull outside air in. Where window caulk matters most (and what to look for) Focus on these spots first for window caulk New Orleans homeowners rely on: Exterior trim to siding – the primary seam; cracked or missing bead = water path. Sill end-caps & miter joints – common rot points; look for gaps or soft wood. Top drip cap – must be sealed at the ends (not across the weep path). Inside corners – hairline cracks equal sneaky drafts. Signs you need new caulk Visible cracking, curling, or open seams Dark stains or soft spots at sill corners You feel a cool draft on windy/rainy days Pro tip: Use paintable, exterior-grade siliconized acrylic on painted trim and 100% silicone on raw masonry, tile, or constant water exposure. Always prep: scrape, wipe clean, dry, and then lay a continuous, tooled bead. Doors: weatherstripping and door sweep replacement Doors leak air (and sometimes water) three ways: around the jamb seals, at the latch/hinge edges, and under the threshold. High-impact fixes Compression/bulb weatherstripping along the jamb—close the door on a dollar bill; if it slides out easily, you need new strip. Strike-side alignment—if the latch doesn’t pull tight, adjust the strike plate before you blame the seal. Door sweep replacement—if you see daylight or feel air at the bottom, swap to an adjustable sweep matched to your threshold type (raised or flat). Quick test: At night, turn lights on inside and look at the door from the porch—if you see light, air (and water) can get through. Biggest leak points checklist (5-minute walk-around) Window trim/sill corners (hairline gaps, peeling paint) Door bottom/sweep (daylight test) Threshold screws loose or out of plane Garage side door (often forgotten) Sliding door meeting stile & track weeps Hose bibs, exterior outlets, and cable/AC penetrations Materials that survive our climate Caulk: Exterior-grade, paintable siliconized acrylic for wood trim; 100% silicone for masonry/metal/glass joints. Look for 25–50 year rating and “exterior.” Weatherstripping: Closed-cell EPDM or silicone bulb; avoid cheap foam tapes outdoors. Door sweeps: Aluminum carrier with replaceable vinyl or silicone fin; choose adjustable models to fine-tune the seal. DIY vs. hire a pro DIY friendly: short runs of exterior window caulk, interior trim cracks, simple door sweep replacement. Call a pro: rotted sills/trim, out-of-square doors, persistent leaks after heavy rain, or when you need multiple doors/windows tuned up quickly. A handyman can also plane sticking doors, reset thresholds, and re-align strikes while they’re there. Fall/Winter-ready sequence (fast wins) Tune the doors: adjust strike, replace weatherstripping, set threshold, install new sweep. Seal high-exposure windows: especially windward sides and any with soft sill corners. Penetrations audit: AC lines, cable boxes, hose bibs—caulk sleeves and plates. Paint touch-ups: spot prime any bare wood after caulking; finish coat seals the deal. Schedule a draft & leak audit. We’ll check doors, windows, and penetrations, perform on-the-spot fixes (sweeps, strikes, minor caulk), and provide a punch list for anything larger. Book a convenient time and be ready.
The holiday season is right around the corner—and that means it’s time to take your decorating game to the next level. Whether you’re preparing for Halloween, Thanksgiving, Christmas, or just seasonal updates, hanging decorations can transform any space. But doing it well—without damaging walls, windows, or ceilings—takes some planning and craftsmanship. That’s where NoHandyman comes in. Here’s your go-to guide for hanging holiday decor with precision, ease, and that professional touch. 1. Plan First: Think Through Layout & Weight Before grabbing hooks or tape, take a moment to map it all out: Measure first — Use a tape measure or laser measure to determine how much space you have. Know the distance from the ceiling to the floor, or the wall width, to ensure your decorations don’t look lopsided or crowded. Know the weight — Paper cutouts and ribbons are light. But wreaths, wooden signs, and heavier decor need sturdier anchors. Mind the surfaces — Drywall, brick, plaster, metal, glass—they all require different hanging approaches. Power & Utilities — Avoid electrical wires, pipes, or HVAC ducts when drilling or nailing. Taking the time to plan makes the execution smoother and safer. 2. Smart Hanging Hardware: Match Your Materials Here’s a breakdown of hardware and methods appropriate for different materials: Surface Type Recommended Fasteners Tips / Caution Drywall / Sheetrock Adhesive hooks, toggle bolts, drywall anchors For heavier items, use toggle bolts or anchors rated for more weight Brick / Concrete Masonry screws, expansion anchors, masonry anchors Use a hammer drill and masonry bit Wood studs or beams Wood screws, lag bolts Try to hit the stud for stronger support Glass / Window panes Suction cups, adhesive window hooks Clean glass thoroughly first for better adherence Ceiling (plaster or drywall) Ceiling hooks, toggle bolts, anchor systems Watch for joists overhead and use proper toggles for heavier pieces Also, always check weight ratings on hooks and anchors. What seems light might pull you into surprise territory once weather or gravity gets involved. 3. Seasonal Ideas & Techniques by Holiday 🎃 Halloween / Fall Hang garlands of dried leaves or faux vines from door frames. Use suction cups to display spider webs or window decals. Suspend lightweight tombstones or ghosts using fishing line. 🦃 Thanksgiving / Autumn Hang a fall wreath on the door using an over-the-door hook. Suspend small wooden signs or banners from ceiling hooks. Use decorative ribbons to hang cornucopias or mini pumpkins. 🎄 Christmas / Winter Holidays Hang ornaments from interior ceiling beams with clear monofilament. Use adhesive hooks (rated for freezing temps if outdoors) for string lights. Mount garlands or greenery above door frames using screw-in hooks or clips. 🥂 New Year / Seasonal Celebrations Hang paper lanterns or pom-poms from ceiling hooks. Use stretch rods to hang banners or streamers across windows. Use magnet hooks (if surfaces permit) for lightweight metallic decor. 4. Prevent Damage & Ensure Longevity Test first — Before fully hanging, test with a light weight. Use felt or rubber pads behind hardware (like behind wreath hangers) to protect finishes. Weatherproof exterior decor — if outdoors, use corrosion-resistant hooks and check if adhesives are rated for temperature swings. Remove decorations properly — Don’t rip off hooks; use the proper angle or method to remove adhesives. Store hardware and templates — Keep screws, templates, and unused hooks in a labeled bag for reuse. 5. When to Call the Pros (That’s Us 😄) Some scenarios are just better left to experts: Heavy or awkward items (mirrors, large wreaths, delicate glass pieces) Complex multi-point hanging (e.g., mobile installations, multi-tier lighting) High ceilings where ladder or lift is needed Ensuring perfectly level alignment across wide spans At NoHandyman.com, we offer precise, damage-free installation for holiday and seasonal decor. We measure, level, anchor—and make sure everything looks stunning and holds strong through wind, temperature shifts, and foot traffic. 6. Customer Spotlight & Before/After Gallery (Consider inserting photos here of past projects — e.g. a beautifully hung front door wreath, ceiling-suspended ornaments, etc.) “NoHandyman installed our Christmas garland above the entryway. Not a single nail exposed — and it’s held through wind and rain!” — Happy Customer 7. Seasonal Timeline & Checklist Here’s a suggested schedule to stay ahead: Time Before Holiday Task 4–6 Weeks Plan layout, order extra hardware, schedule installation if hiring pro 2–3 Weeks Test surfaces, pre-drill where needed, pre-measure everything 1 Week Begin hanging lighter decorations; try test hooks 2–3 Days Install main heavy items and finalize layout Day Of Power up lighting, make final adjustments, touch-up paint if needed 8. Final Tips & Thoughts Don’t overload a single hook — distribute weight. Use symmetry to make decorations feel balanced. Think in layers — backdrop, mid-ground, accents. Color coordinate your hardware: brushed nickel, matte black, white — to blend in. Keep an eye on safety — no hanging near walkways where someone might bump into it.
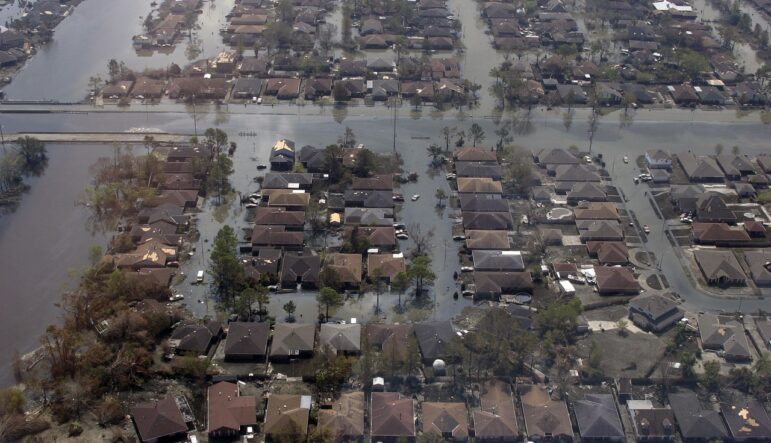
Twenty years ago, Hurricane Katrina changed our city and how we think about readiness. As we mark the anniversary, we’re pulling together the best takeaways from our past hurricane tips and updates into one practical checklist you can act on now. You can also browse our earlier storm-prep posts here: Hurricane Preparation: How a Handyman Can Help Secure Your Home Storm-Prep Timeline: What to do and when Do these now (pre-season or today) Roof & exterior check: Look for missing/loose shingles, cracked caulk around flashing, soft or sagging soffit/fascia, and loose siding. Schedule repairs before peak season. Gutters & drainage: Clean gutters and downspouts; make sure water discharges 4–6 feet from the slab. Clear yard drains and any debris around curb inlets. Windows & doors: Have rated shutters or pre-cut plywood ready for each opening. Label pieces and store the hardware with them. Flood readiness: Keep 10–20 sandbags on hand. Consider door flood dams for low entries. If you have a backflow preventer, verify it operates smoothly. Power plan: Test your generator and cords. Portable units must run outside—never in a garage or near windows/doors. Documents & inventory: Photograph each room, appliances, and serial numbers; back up to the cloud. Keep IDs, insurance, and deed in a waterproof pouch. Emergency kit: At least 3 days of water (1 gallon/person/day), shelf-stable food, medications, pet supplies, flashlights, batteries, and phone power banks. 72–48 hours before expected impact Stage shutters/plywood and hardware at each opening; pre-drill if needed. Trim small branches near the house; secure or store furniture, grills, planters, and tools. Lower pool water if recommended; secure automatic cleaners. Test sump pumps and clear any debris from yard/curb drains. Refill prescriptions and top off vehicles. 24 hours before Install shutters/plywood. Move vehicles to higher ground if you’re in a flood-prone area. Sandbag low doors/garage. Elevate valuables and small appliances. Freeze bottles of water (they double as ice). Set fridge and freezer to their coldest settings. Charge devices and power banks; confirm generator placement and cord plan again. During the storm Shelter in an interior room away from windows. Keep shoes on; use flashlights rather than candles. Run generators outdoors only, at least 20 feet from doors and windows. After the storm Photograph damage before cleanup. Watch for downed lines, gas odors, and hidden water damage. Start drying immediately: ventilation, fans, and dehumidifiers. Discard porous materials that were submerged. Document all repairs and save receipts for insurance. Home Hardening: Where prep pays off most 1) Roof & attic Re-secure lifted shingles and ridge caps; reseal flashing at chimneys, vents, and valleys. Seal exposed nail heads. If you’re already renovating, ask about hurricane straps/clips. In the attic, look for pinholes of light, water stains, damp insulation, and moldy odors. 2) Siding, soffit, and fascia Refasten loose vinyl or wood siding; replace damaged panels and corner pieces. Reinforce soffit panels under eaves—wind often starts damage here. Prime and paint exposed wood to shed water. 3) Windows, doors, and garage doors Install rated shutters or use pre-cut 5/8-inch exterior-grade plywood with proper fasteners. Replace worn weatherstripping and door sweeps; check thresholds for a tight seal. Add vertical bracing kits to garage doors; they’re common failure points. 4) Flood mitigation Sandbag or use door dams at low entries. Elevate appliances/air handlers in low areas; strap water heaters. Improve grading around the slab. Add downspout extensions or splash blocks. 5) Power & communications Size your generator for essentials (fridge, a few outlets, fans). Keep CO detectors with fresh batteries. Label a “dark power” kit (heavy-gauge cords, multi-tap, tape) and store it with the generator. Quick, Printable Checklist Exterior Roof inspected; flashing and nail heads sealed Loose siding/soffit/fascia repaired Gutters/downspouts cleared; discharge extended 4–6 ft Yard/curb drains cleared Openings Shutters or labeled plywood for every window/door Weatherstripping and thresholds intact Garage door bracing installed Flood Readiness 10–20 sandbags and/or door dams on hand Appliances elevated where needed Backflow preventer checked (if installed) Power & Safety Generator tested; outdoor placement planned Heavy-gauge extension cords (12- or 10-gauge) CO detectors with fresh batteries Docs & Supplies Photos/inventory backed up to the cloud IDs, insurance, and deed in waterproof pouch Water, food, meds, pet supplies, flashlights, batteries, power banks Further Reading from Our Blog We’ve covered shutters, sandbag placement, drainage tune-ups, and generator safety in earlier posts. Browse all hurricane tips: https://www.nohandyman.com/?s=hurricane Need a hand before the next storm? New Orleans Handyman can help with: Roof, soffit, fascia, and siding repairs Shutter installation or plywood cutting and labeling Gutter cleaning and downspout extensions Door seals, thresholds, and flood-barrier setup Generator setup (outdoor pad, cord kit, safety review) Get help: Call us at 504-358-0399 or request service at nohandyman.com/contact.

As summer winds down, now is the perfect time to get your home in shape for the cooler months ahead. The transition between seasons is when small issues can be addressed before they turn into bigger (and more expensive) problems. Here’s your 7-step end-of-summer checklist to keep your home safe, efficient, and ready for fall. 1. Inspect and Repair Outdoor Surfaces Check decks, patios, and walkways for cracks, loose boards, or uneven surfaces. Late summer is ideal for sealing decks and repairing concrete to prevent water damage in fall and winter. 2. Clean and Store Outdoor Furniture Give patio chairs, tables, and cushions a good wash before storing them in a dry space. This prevents mold, mildew, and weather-related wear. 3. Refresh Landscaping and Garden Beds Trim shrubs, mow the lawn, and remove weeds. Mulch flower beds to protect plant roots during temperature drops, and consider planting fall-friendly flowers like mums or pansies. 4. Clear Gutters and Downspouts Don’t wait for fall leaves to cause blockages. Clearing gutters now helps avoid water damage, roof leaks, and foundation issues when the rain starts. 5. Check Exterior Paint and Siding Look for peeling paint, damaged siding, or gaps around windows and doors. Touch-ups now can protect your home from moisture and pests in the coming months. 6. Service Lawn Equipment Before storing mowers, trimmers, and blowers, clean and maintain them. Empty gas tanks or add fuel stabilizer so they’re ready to go in the spring. 7. Prep Outdoor Lighting Days get shorter in the fall, so make sure exterior lights are working. Replace bulbs, clean fixtures, and consider adding motion sensor lights for safety. By tackling these projects before fall arrives, you’ll protect your home, extend the life of your outdoor spaces, and enjoy a smoother transition into cooler weather. If you need help with repairs or seasonal maintenance, NoHandyman.com is here to handle the hard work for you. Ready to Get Your Home Fall-Ready?Don’t wait until the first cold snap to take action. Let No Handyman help you with repairs, cleanup, and prep work so you can enjoy a worry-free season. 👉 Request Your Free Quote Today
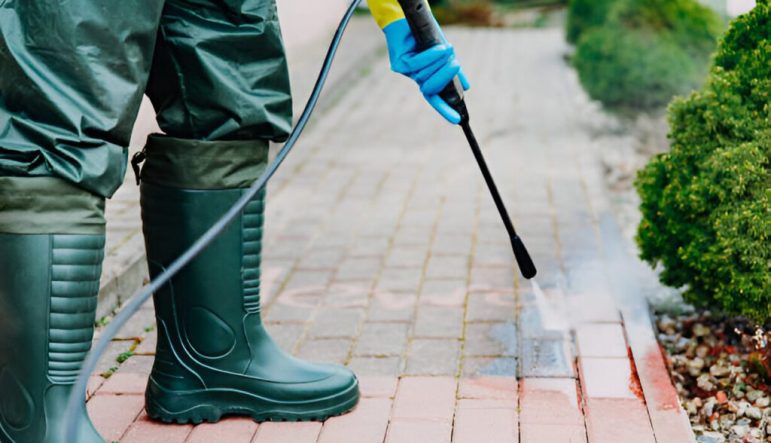
Whether you’re a homeowner looking to maintain curb appeal or a business owner aiming to create a positive first impression, pressure washing is one of the most cost-effective and efficient ways to keep your property looking clean, fresh, and damage-free. In fact, regular pressure washing can save you money, increase property value, and prevent long-term wear and tear. At Nohandyman.com, we understand the importance of keeping your surroundings in top shape—and we’re here to make it hassle-free. 🏠 For Homeowners: More Than Just Aesthetic Appeal Your home’s exterior is constantly exposed to the elements—dust, mold, mildew, bird droppings, and more. Over time, these contaminants not only make your house look dirty but can also cause permanent damage to siding, brick, concrete, and wood. Benefits of Pressure Washing for Homes: Prevents long-term damage caused by mold, algae, and grime. Boosts curb appeal, especially useful when preparing to sell your home. Increases lifespan of exterior surfaces like decks, patios, and driveways. Improves air quality by removing allergens and pollutants. A quick wash from New Orleans Handyman can make your home shine like new—without the need for harsh chemicals or expensive renovations. 🏢 For Businesses: Cleanliness Means Credibility First impressions matter. A well-maintained exterior reflects professionalism and attention to detail. Whether it’s storefront signage, sidewalks, parking lots, or building facades, pressure washing ensures that your business presents a clean and welcoming image. Why Businesses Should Invest in Pressure Washing: Attract more customers with a neat, tidy appearance. Reduce slip hazards from oil, grease, or mold buildup on walkways. Comply with health and safety standards, especially for food and retail businesses. Save on maintenance costs by preventing early deterioration of surfaces. Using Nohandyman.com, businesses can schedule quick, efficient service that won’t disrupt day-to-day operations. 🌎 Eco-Friendly & Efficient Cleaning Modern pressure washing techniques use significantly less water than traditional methods and eliminate the need for harmful chemical cleaners. At nohandyman.com, we use eco-friendly equipment that’s safe for your surfaces and the environment. ✅ Final Thoughts Pressure washing isn’t a luxury—it’s a necessity for protecting your property, maintaining its value, and leaving a great impression. Whether it’s your cozy family home or your commercial storefront, routine cleaning helps you avoid costly repairs and keeps your environment looking its best. Ready to freshen up your property? Visit nohandyman.com today and book a pressure washing service you can trust.